How to Make Money Selling AI Posters on Etsy in 2026
Selling posters on Etsy with AI-assisted art is, honestly, the easiest way I know to start a scalable print-on-demand business in 2026. I started as a one-man shop, spending evenings designing and creating mockups, and I quickly learned the art wasn't the bottleneck—operations were. The models make great images now. The real work is turning those images into hundreds of well-packaged, discoverable listings and a predictable fulfillment flow. If you want to make money Etsy AI posters, you need reliable POD pricing, repeatable image workflows, and automation that stops you doing boring manual work.
I built Artomate because I hated doing the same mockup and listing steps over and over. Automating that pipeline saved me weeks of work and let me focus on designs and tests that actually move the needle. Over the next 4,000+ words I’ll walk you through the exact process I use to pick niches, generate production-ready art, create mockups that convert, price for profit, and scale using automation and trusted POD partners. This is practical, field-tested advice for anyone who wants to treat Etsy as a real print on demand business and not a hobby store.
Why AI posters are the fastest path to a scalable Etsy print-on-demand business
The low-friction product category
Posters are simple. No SKUs with dozens of sizes and colors, no complicated build-your-own options, and no fragile multi-part products. That simplicity matters because it reduces the number of things that can go wrong when you scale. I can create a poster design, build a few mockups, and have a live listing in under an hour once the workflow is sorted. That speed translates into testing lots of ideas, which is how you find winners fast.
But "simple" doesn't mean "easy to profit from." The barriers to entry are low, so differentiation and efficient operations become your competitive moat. When you sell AI art on Etsy you need two things to stand out: consistently high-quality, production-ready images and a reliable fulfillment/packaging strategy that reduces refunds and negative reviews. Posters are forgiving—small color shifts and minor texture differences rarely lead to returns the way apparel sizing issues do—but customers still expect premium presentation.
Practical tips:
- Standardize one or two paper weights for your shop (e.g., 200–250gsm matte and 170–200gsm satin). This simplifies production and listing metadata.
- Create a single SKU naming convention and file naming template: niche_designname_size_variant_printdate (e.g., retro_space_explorer_24x36_framed_2026-03-01).
- Maintain a single source of truth (Google Sheet or Airtable) with POD base costs, SKU IDs, mockup filenames, and Etsy listing ID. This reduces human errors when updating pricing or handling returns.
These small operational habits are what let a solo seller transition into running a proper Etsy side hustle that can scale into a small team.
Why scale matters on Etsy
Etsy’s search now rewards catalog breadth more than it used to. More listings mean more indexed keywords and more ways for shoppers to land in your shop. I’ve seen shops go from 50 to 500 listings and double their traffic mainly because each new listing targets a different long-tail phrase. If your plan is to make money with Etsy print on demand 2026-style, you can’t rely on one or two hero products. You need catalog breadth and repeatable listing production.
Scale also unlocks confidence for advertising: you want several winning SKUs before you pour significant ad spend in to avoid amplifying a bad creative. Quantity gives you the ability to run portfolio-level ads, bundle campaigns, and to offer seasonal promotions without wiping out core revenue.
Operational scale checklist:
- Aim to publish in batches (10–20 listings at a time) rather than one-by-one.
- Use templates for descriptions, titles, and tag groups that you can slightly vary per listing.
- Track performance by cohort: niche + launch date + channel. This reveals which niches and which creatives scale.
Two commercial levers you must control
There are two things that determine whether your posters make money: fulfillment cost (what your POD charges and shipping) and discoverability (SEO, images, and listing cadence).
Control fulfillment costs first because margins vanish fast if your base price or shipping is high. That’s why I use Printshrimp for posters—200gsm museum-grade paper, shipping included, and base prices that let me sell a large poster at £34.99 and still pocket a healthy margin. Control discoverability second by publishing many listings, refreshing metadata, and using strong mockups that get clicks and purchases.
A few additional levers to watch:
- Packaging quality: A dented or soggy tube leads to a refund or poor review. Invest in slightly thicker mailing tubes and acid-free tissue.
- Shipping transparency: Use clear shipping estimates in your listings and include tracking. Small increases in posted handling time often reduce cancellations and negative reviews.
- Returns policy: An owner-friendly but fair returns policy reduces chargebacks. Offer partial refunds for minor defects and full refunds for major errors.
Market signals and numbers you need to care about (2025–Mar 2026)
Etsy fees and how they eat your margin
Etsy charges a $0.20 listing fee per listing and a 6.5% transaction fee on the order total, plus payment processing roughly 3% + $0.25 in many regions. Those numbers matter because they’re fixed or percentage costs you must include when you price. When I model a SKU I assume Etsy takes about 10% of the order total in combined fees as a practical rule of thumb. If you ignore this you’ll price too low and wonder why you’re not profitable.
Breakdown example (rounded):
- Listing fee: $0.20 (one-time, but factor into cost of testing)
- Transaction fee: 6.5% of sale
- Payment processing: ~3% + fixed per-order fee depending on currency
- Offsite ads: if enabled, an attributable fee can vary between 12–15% for some orders
Tip: Add per-listing fee amortization into your test economics. If you plan to test 50 listings in a month, the $0.20 fee is a small but real upfront cost—factor it into your ad allowance or test budget.
Conversion benchmarks and what I watch
Platform-average conversion rates for Etsy float around 1.5–3%. If a listing is converting above 3% in my niches, I treat it as a winner. But I don’t wait for sales alone. Early signals—CTR from search, favorites, and review velocity—tell me whether a listing will move. For example, a listing with 10,000 impressions but a low CTR is likely an image or title problem. I track views, CTR, favorites, and conversion at listing level. Those four metrics give a fast read on what to iterate.
Detailed monitoring stack I use:
- Views (impressions) and sessions
- CTR from search (impressions -> clicks in Search)
- Favorites and add-to-cart rate
- Conversion rate (visits -> purchases)
- Review velocity (reviews per 100 sales)
Action thresholds:
- CTR below 1%: change hero image and title immediately.
- CTR 1–2% and conversion <1%: review mockups, pricing, and product details.
- Conversion >3%: double down with ads and create complementary SKUs.
POD pricing, pricing bands and margins
Poster base costs vary, but typical POD base prices fall between $7 and $18 depending on size and finish. Printshrimp is my recommended partner for posters because their A1 poster price is typically around £11.49 including shipping. If I sell that A1 at £34.99, I can make £20+ profit after Etsy fees and payment processing. For most poster SKUs I aim for a 40–60% gross margin before ad spend. That margin range lets me test ads and still have room to scale.
Pricing bands to consider:
- Budget posters (under $20): high-volume, low-profit; good for hit-and-run promotions.
- Mid-tier posters ($25–$45): sweet spot for most shops—good margin and frequent purchases.
- Premium posters ($45+): framed prints, large sizes, or limited editions. These require stronger branding and lifestyle imagery but can dramatically raise AOV.
Use tiered pricing to capture different customer segments: offer an unframed budget variant, a framed mid-tier, and a limited edition signed or numbered run as a premium option.
Choosing niches that actually sell
My niche selection framework
I pick niches the way a market trader picks stalls: tight and repeatable. Instead of “art” I pick sub-niches like retro sci-fi typographic posters, minimalist botanical line-art, or hand-lettered quote posters for home offices. My rule is to choose three focused niches and test three sizes for each. Narrow niches reduce competition and let me target specific search phrases and social audiences. It also means my mockups and styling stay consistent, which helps with branding.
How to validate a niche before investing time:
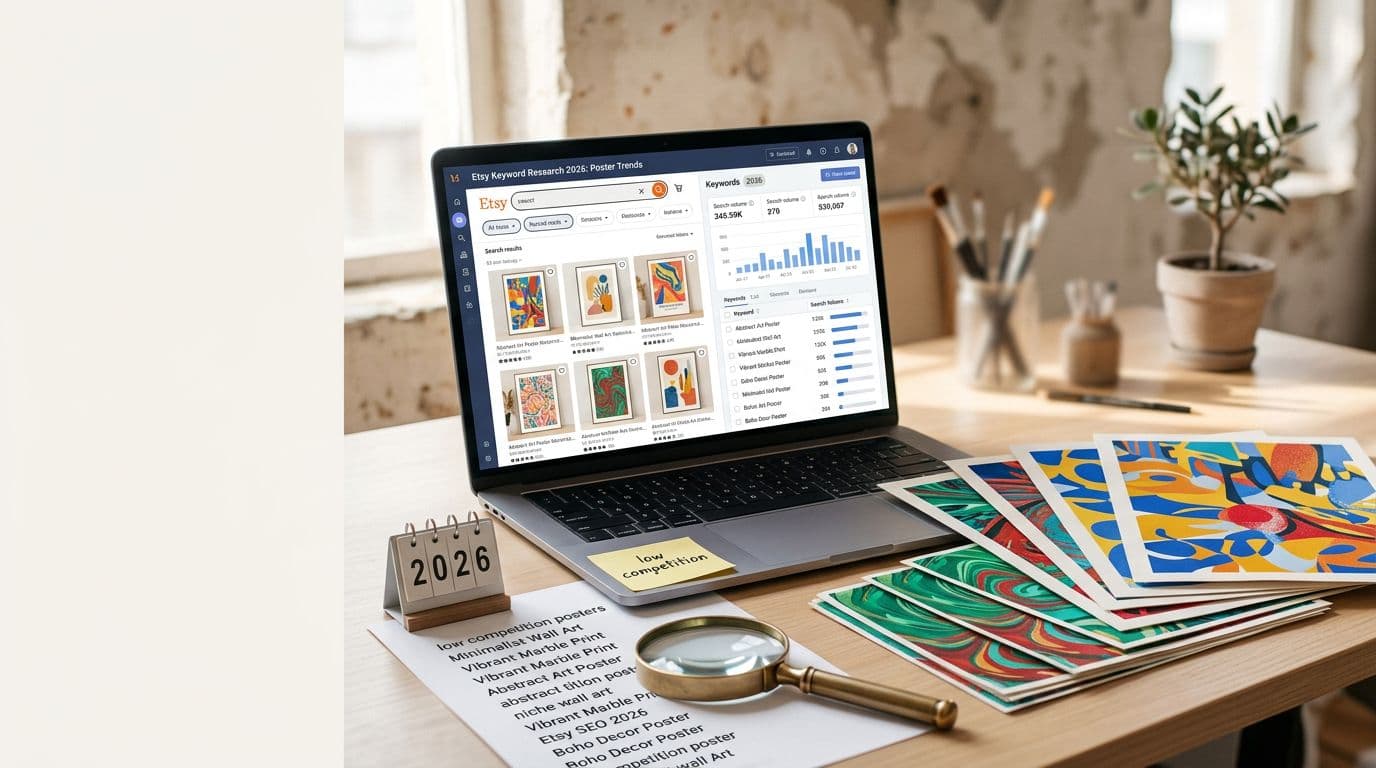
- Search volume: Use eRank, Marmalead, or other Etsy tools to verify steady search volume for 6–12 months.
- Competition check: if the top listings all look identical and are clearly generic, that might indicate a saturated or supplier-driven niche. Look for niches with 10–50 active sellers in a steady range.
- Audience fit: Can you find a community or social audience (Pinterest boards, TikTok hashtags, subreddits) interested in the niche? If yes, you’ll have distribution channels.
- Monetization potential: Check average prices—if customers routinely pay $30–$60 for similar prints, it’s a better niche than one where everything sells for $12.
Niche testing matrix (example):
- Niche: Retro Sci-Fi
- Keywords to target: "retro space poster", "vintage sci-fi print", "space travel wall art"
- Audience channels: TikTok hashtags (#retrospace #vintageposter), Pinterest boards, niche forums
- Test cadence: 15 listings, 3 sizes, 30 days, $150 ad budget
How I pick sizes and SKUs
I pick three sizes per design—small, medium, large—because buyers like options and because different sizes hit different price bands. Typical sizes I use: 12×18 (small), 18×24 (medium), and 24×36 (large). I list framed and unframed variants if the POD supports it, because framed listings allow a higher price and attract gift buyers. Variants also help me test price elasticity: framed for customers who want a finished product, unframed for budget buyers.
SKU strategy tips:
- Offer sizes that map to real-world frame sizes to reduce customer confusion.
- Use variants only if the POD truly supports different fulfillment paths; otherwise separate listings may be cleaner for SEO.
- Consider offering bundles (e.g., gallery wall sets of three 12×18 prints) to increase AOV.
Inventory idea:
- Core SKU per design: unframed medium
- Variants: small unframed, large unframed, medium framed
- Upsell: add a 10–15% price increase for premium paper or thicker stock
Example niches that work for me
Some niches that consistently perform well are retro travel posters with modern color palettes, botanical prints with single-line drawings, and large typographic motivational posters for home offices. For each, I generate 10–20 hero images with small stylistic changes, create complementary mockups, and test them across one social channel. Keep your niche tight but don’t be afraid to try adjacent themes if a design performs well.
Sample niche expansions:
- Retro travel -> Expand to "retro city maps" and "retro beach posters"
- Botanical line art -> Add seasonal sets (spring florals, dried botanicals)
- Typographic office posters -> Expand into coordinating desk prints or mousepad designs (if your POD supports different product types)
The image generation stack that gets consistent results
Models I rely on
I use a specific set of models because predictability matters. My Tier 1 picks for consistent, production-ready poster art are GPT Image 1.5, Nano Banana Pro, Nano Banana 2, Nano Banana (original for fast iterations), and Seedream 5.0 Lite for high-resolution multi-reference work. Nano Banana 2 is my go-to when I need crisp typography and rich texture. These models let me iterate quickly and produce images that require minimal cleanup.
Choosing a model is about predictability and license clarity. When you sell AI art on Etsy, you must be confident the model's license allows commercial resale and that you can provide provenance if needed.
Factors when selecting a model:
- Output consistency (can you reproduce style with similar prompts?)
- Typography handling (some models struggle with readable text)
- License and TOS (commercial use clarity)
- Speed and cost per generation
My prompt workflow and records
I keep a prompt notebook. Every time I create an image I store the prompt, the model name, seed, and any reference images. That history is worth more than you think. If a buyer or platform asks about provenance you can show a clear edit history. Practically, it also lets me replicate a look months later. I save layered PSDs for each hero image and export a print-ready TIFF at 300 DPI with the correct color profile.
Prompt template example (retro sci-fi):
- Base: "retro sci-fi travel poster, minimalist composition, bold geometric shapes, muted teal and coral palette, vintage halftone texture, centered typography area, high detail, 300 DPI"
- Add style modifiers: "film grain, paper texture, subtle vignette"
- For typography: append "leave central area blank for vector text overlay"
Record keeping best practices:
- Maintain a CSV or Airtable with columns: prompt, model, seed, output filename, PSD filename, export filename, listing ID, creation date.
- Keep a changelog: notes about what worked/failed for each prompt iteration.
- Archive final print files in a cloud bucket with versioning (so you can revert).
Post-processing essentials
Raw AI outputs often need compositing, color correction, and typographic fixups. I remove small artifacts, clean up edges, and ensure any text is crisp at print resolution. For posters that include typography I prefer to overlay vector text in Photoshop or Affinity so the print is sharp. I export final print files with bleed settings if the printer requires them. That post-processing step separates listings that feel professional from those that feel auto-generated.
Post-processing checklist:
- Convert to CMYK only if your POD requires it; most print-on-demand partners accept sRGB and handle conversions.
- Ensure 300 DPI at final print dimensions and add bleed (usually 3–5mm depending on POD).
- Rasterize textures but use vector for typography when possible.
- Flatten layers into a print-ready TIFF/PDF for upload; keep layered PSDs for edits.
- Perform a soft-proof using an ICC profile if you want tighter color control.
Color troubleshooting tips:
- If prints are consistently darker than screen, slightly increase midtone brightness.
- If reds/magentas shift, examine the saturation levels and remove extreme saturation in those channels.
- Order physical proofs from your POD for any new paper type.
Mockups, product images and what converts (my exact checklist)
Hero image rules I follow
Your hero image is the listing’s ad. I use a single hero crop that matches Etsy’s recommended aspect and shows the poster in a clean, well-lit room. It must show scale—no floating poster on a white background alone. I also make sure the hero has correct color balance and isn’t over-processed. If the hero doesn’t get clicks, nothing else in the listing matters.
Hero image checklist:
- Use a lifestyle scene with a couch, shelf, or console to show scale.
- Include one close-up texture shot for perceived quality.
- Keep the composition uncluttered and the lighting natural.
- Use a color-accurate edit: avoid heavy vibrance or unrealistic saturation.
A/B testing tips:
- Test two hero images for the first two weeks: one with a close-in framed shot and one showing a large wall scale. Measure CTR and conversions.
- Rotate a 3rd seasonal hero image on holidays to test whether recency affects clickthrough.
Lifestyle mockups and scale shots
I create 3–4 lifestyle mockups showing the poster above a sofa, in a gallery wall, and on a nightstand. I include a photo where a hand or a piece of furniture shows scale. Buyers need to know how big the poster will look on their wall. That simple context improves conversion more than any fancy graphic.
Mockup production tips:
- Use real photos for backgrounds rather than 3D renders for a more authentic look.
- Create a mockup library: one neutral living room, one modern office desk, one gallery wall, one bedroom setting. Use the same backdrops across a niche for cohesive branding.
- Include a thumbnail with exact dimensions overlay (e.g., a small diagram showing 24×36 scaled to an 8ft wall).
Framed vs unframed variants
I always test framed and unframed options. Framed SKUs let you charge more and attract customers looking for ready-to-hang pieces. Unframed options hit price-sensitive buyers. When I list both, I display a framed mockup as one of the lifestyle images so buyers can visualize both options. Framed listings usually have higher AOV, which helps cover ads.
Framing considerations:
- Confirm the POD partner’s framing quality—low-quality frames damage conversion.
- If your POD doesn’t offer framing, partner with a local framer for a premium line or offer DIY framing kits as an upsell.
- Provide a clear framed vs unframed shipping guide and approximate weights to set expectations.
Listing creation and SEO that actually ranks on Etsy
Title and tags recipe I use
I front-load the primary phrase in the title. For example: “Retro Sci-Fi Poster 24x36 | Vintage Space Travel Wall Art | Home Office Decor”. That exact-match first phrase helps Etsy match search queries. I use all 13 tags and fill every relevant attribute. Tags include exact phrases and synonyms like “sci-fi wall art”, “space poster 24x36”, and “vintage travel poster”. Use tools like eRank or Alura to validate search volume but make titles human readable.
Title formula I use:
- [Primary keyword] [size] | [secondary keyword 1] | [use-case or location]
- Example: "Botanical Line Art Poster 18x24 | Minimal Plant Print | Living Room Decor"
Tag groups (examples):
- Exact match tags: "retro sci-fi poster", "space poster"
- Size tags: "24x36 poster", "A1 poster"
- Use-case tags: "home office decor", "gallery wall"
- Occasion tags: "housewarming gift", "birthday gift"
- Style tags: "midcentury modern", "minimalist"
Use attributes fully: material, color, subject, orientation, and whether it’s framed. Etsy filters often convert well for buyers who know exactly what they want.
Writing descriptions that convert
I write a 150–300 word description that covers size options, paper type, shipping time, and a short AI-assisted disclosure such as: “This poster was created with AI-assisted tools and finished by hand for print.” That line is brief, builds trust, and follows Etsy guidance without overcomplicating things. I also include a short paragraph about framing options and care instructions. Clear practical details reduce returns and questions.
Description template (editable):
- Opening: one sentence selling the mood/benefit.
- Details: sizes, paper type, print method, turnaround time.
- Shipping & returns: how items ship, tracking, return window.
- AI disclosure: short, factual line about AI assistance and final hand-finishing.
- Care instructions and framing suggestions.
- Call to action: "Add to cart" or "Message me for custom sizes."
Attributes, recency and cadence
Fill every attribute. Etsy uses attributes for filters and relevancy. After a listing launches I refresh metadata for top performers periodically. Renewing or updating a listing gives a small recency boost and helps when you push new mockups. My cadence is regular: batch launch 10–15 listings per niche and refresh the top 10% weekly while monitoring performance.
Cadence suggestions:
- Week 1: Launch batch and promote on one social channel.
- Week 2–4: Measure CTR and conversion. Adjust titles and hero images.
- Month 2: Refresh top performers (new mockup variant and small price test).
- Ongoing: Add 3–5 new listings per week to maintain catalog growth and recency.
Automation tips:
- Use CSV templates for bulk upload of tags and titles if your tool supports it.
- Maintain a canonical description template that you modify per listing—this keeps branding consistent and speeds up new uploads.
Pricing and profit math: How I price to make money
My pricing formula
Price = POD base + Etsy fees (approx 10%) + payment processing + ad allowance + target gross margin. I always run a quick check on numbers before listing. If I can’t hit a 40% gross margin before ad spend, I either increase the price or change the size/finish.
Spreadsheet basics (columns to include):
- SKU ID
- POD base cost
- Estimated shipping (if charged separately)
- Etsy fees (6.5% of sale)
- Payment processing (% + fixed)
- Ad allowance (% of sale planned)
- Target gross margin (%)
- Final price recommendation
Formula example (pseudocode):
- target_price = (pod_cost + fixed_fees) / (1 - (etsy_pct + payment_pct + ad_allowance + target_margin))
Example SKU calculations
Here’s a real example I use for poster pricing. Printshrimp A1 base cost ~£11.49 including shipping. If I price the poster at £34.99: subtract POD £11.49, subtract Etsy fee (~6.5% of £34.99 = £2.27), subtract payment processing (~3% + £0.25 ≈ £1.30), you’re left with about £19.93 before ads. That’s a healthy margin and leaves room for modest ad spend. If I planned 10% ad allowance, my net is still close to £17 per sale.
Example breakdown (rounded):
- Sale price: £34.99
- POD cost: £11.49
- Etsy & payment fees (~10%): £3.50
- Net before ads & tax: £19.99
- Planned ad allowance (10%): £3.50
- Net contribution margin: ~£16.49
This math lets you be surgical about which SKUs to advertise and which to keep as organic drivers.
Offsite ads, promotions and margins
If you participate in offsite ads remember the attributed fee can be 12–15% for some orders. Model that into your pricing if you plan to rely on paid traffic. I usually run small test budgets on Etsy Ads and Pinterest first, and only increase spend after I see repeatable sales at a profitable CPA. If ads push ROAS under the margin target, I pause and retest imagery or price points.
Promotion strategies that protect margin:
- Time-limited discounts for email subscribers only (keeps conversion but limits public discounting).
- Bundles: sell sets to increase AOV while keeping per-item margin healthy.
- Upsells at checkout: offer a matching smaller print for 30% off when customers buy a large poster.
Launching, testing and scaling with automation
The test launch plan I use
I never launch one listing and hope. I batch launch 10–15 listings per niche and promote a single social channel—usually TikTok or Pinterest—so I can see how designs perform externally. I run a 30-day test with a modest ad budget of $100–$300 per niche. Within that window I track impressions, CTR, favorites, and conversions and kill or double-down based on performance.
Sample 30-day test playbook:
- Days 1–3: Publish batch and share three short social posts (behind-the-scenes, product reveal, lifestyle shot).
- Days 4–14: Monitor CTR and conversion; swap hero image if CTR < 1%.
- Days 15–30: Run $100–$300 experimental ad split across Etsy Ads and Pinterest; pause the channel with higher CPA after a week.
- Day 30: Review cohort performance and either scale (double ad spend on winners) or archive the listing.
Metrics to watch and how I decide winners
I treat a listing as a winner if it hits a conversion rate above 3% or shows strong CTR and favorites with at least a few purchases. If a listing gets impressions but low CTR, I update the hero image and title. If CTR is good but conversion is low, I check mockups, product details, and price. I keep tests tight and make decisions based on data, not hope.
Decision matrix example:
- High CTR, Low Conversion: Look at price, shipping time, review count, and mockups.
- Low CTR, Any Conversion: Replace hero image and retest for 7–10 days.
- Low impressions: Improve SEO, tags, and promote on social channels.
Automation and batching (where I save the most time)
This is where automation pays for itself. Creating mockups, resizing images, setting taxonomies and uploading listings by hand eats time. Tools that batch mockups and automate SEO let you scale from 50 listings to 500 without hiring extra help. This is exactly why we built Artomate — to automate the mockup-to-listing pipeline so you can focus on design and testing. Using automation reduces human error, keeps metadata consistent, and saves hours per week. If you plan to scale your print on demand business, automation is not optional.
Practical automation tasks to implement:
- Batch mockup renderer: Input final print file and output a suite of lifestyle and scale images.
- Bulk CSV creator: Generate title, tags, description, and attribute columns for Etsy import.
- Scheduled refresh: Auto-update top-performing listings with fresh hero images monthly.
- Notification system: Alerts for low stock (if you also sell physical prints), negative reviews, or shipping delays.
Delegation and outsourcing:
- Hire a VA for routine tasks like uploading CSVs, monitoring customer messages, and processing small refunds.
- Use a freelance designer for advanced mockup creation and high-res compositing when you need a premium look.
Common mistakes that kill shops fast (true stories)
Documentation and legal pitfalls
Many sellers assume “I used an AI model so I own it” and move on. That’s risky. Keep prompt histories, model metadata, and PSDs. I store source prompts and export logs for every SKU. If a platform or buyer questions provenance this documentation is your defense. Also confirm the commercial terms of the model you use. Not all models have the same license for resale.
Legal practicalities:
- Save the license text or snapshot of the model’s TOS the day you use it.
- If you heavily reference a copyrighted source image (photograph, movie still), get explicit permission or avoid the reference.
- Consider watermarking early proofs when posting to social to avoid unscrupulous re-use before you publish.
Mockup and quality mistakes I see
I’ve lost sales because mockups looked cheap. Sellers sometimes use poorly lit stock images or mockups that don’t show scale. Low-quality mockups equal low CTR and more returns. Spend time making the hero image and lifestyle shots look real and consistent. Clean PSDs and real framing shadows help a lot.
Real stories:
- A seller used a textured overlay that made text unreadable at thumbnail size. CTR tanked—fix: remove overlay and create a separate close-up texture image.
- Another seller used mismatched color grading across a niche; consumers perceived items as inconsistent, which reduced cross-sell potential. Fix: create one color grading preset.
Marketing mistakes that waste budget
Some sellers pour money into ads before they have a winning creative. If the listing hasn’t proven organic traction, ads will amplify a bad listing and waste budget. Test organically and with a small paid budget, then scale winners. Also, don’t fixate on one channel. Pinterest and TikTok both move product for posters; test both and then double down on the one that gives the most consistent CPA.
Ad mistakes and remedies:
- Mistake: Running a broad Etsy Ad on a poor-converting listing. Remedy: Optimize listing first, then test with a small audience.
- Mistake: Using single creative across all channels. Remedy: Tailor creatives—short vertical videos for TikTok, high-quality lifestyle pins for Pinterest.
Future outlook and where to place your bets (2026+)
Model quality, speed and what it means for sellers
Model quality and speed are improving fast. Nano Banana 2, GPT Image 1.5 and Seedream 5.0 Lite produce print-ready images with better typography and consistency. That means iteration is cheaper and the winners will be those who iterate fastest. If you can produce, test and kill designs weekly you’ll outpace slower sellers.
What to invest in now:
- Streamline prompt-to-print pipeline so you can iterate designs daily.
- Build a content calendar for social platforms to keep a steady experiment flow.
- Invest in physical proofing so you can spot print anomalies early.
Policy and provenance trends
Expect copyright debates and platform policies to tighten. Courts and platforms are clarifying expectations for human involvement and provenance. I recommend keeping prompt and edit logs, and using a brief disclosure on listings. That’s practical insurance and improves buyer trust.
Recommended provenance steps:
- Maintain a public "About" page in your shop explaining your creative process and how AI contributes to the work.
- Be ready to provide prompt logs and file history if Etsy or a buyer asks.
- Avoid deceptive claims: don’t say "hand-painted" if the work is generated and minimally edited.
Operational advantages that last
Fulfillment reliability and speed will separate winners. PODs like Printshrimp that include shipping and dispatch quickly let you promise short turnaround times and reduce complaints. Automation will be a strategic advantage. Sellers who automate mockups, SEO and listing uploads will scale breadth without sacrificing quality, and that scale is how you build a serious Etsy side hustle.
Long-term bets:
- Build recurring revenue via subscription-style offerings (monthly poster clubs) or seasonal limited editions.
- Use customer data (repeat buyers, preferences) to offer targeted restocks and curated bundles.
- Invest in a small QA team or service to order monthly spot-check prints and confirm real-world quality.
Final Thoughts
If you want to make money selling AI posters on Etsy, treat it like a small business from day one. Use production-ready models, document prompts and edits, choose a POD partner with predictable pricing like Printshrimp, and automate the repetitive work so you can test ideas rapidly. I found that the difference between a hobby shop and a profitable business was not a better design, it was the ability to publish and iterate hundreds of listings with consistent metadata and high-quality mockups.
Start with a tight niche, test 30–50 listings, and commit to the metrics. Use automation to scale your winners, and keep a close eye on margins so ads don’t destroy profitability. If you want help automating that pipeline, tools like Artomate speed up mockup generation and listing creation so you can focus on what matters—design, testing and growth. Treat the first 90 days as your lab. Fail fast, double down on winners, and you’ll have a real print on demand business by month four.
Actionable 90-day plan (summary):
- Day 0–7: Choose 3 niches and set up your prompt & file system.
- Day 8–21: Generate 30–45 hero images, post-process, create mockups.
- Day 22–30: Launch 10–15 listings per niche and begin light social promotion.
- Month 2: Analyze, iterate hero images and titles, run small ad tests.
- Month 3: Scale winners, automate batch uploads, and hire a VA for operations.
If you follow this roadmap you’ll not only learn how to sell AI art on Etsy, you’ll build a repeatable system to make money from Etsy AI posters in 2026 and beyond. The creative edge is nice to have—what really wins is process, speed, and clean execution.

George Jefferson
Founder of Artomate
George has generated over £100k selling AI-generated posters on Etsy and built Artomate to automate the entire print-on-demand workflow. He writes about AI art, Etsy strategy, and scaling a POD business.
Learn more about me →